twitter
    Find out what I'm doing, Follow Me :)

Thursday 27 October 2011

Configure Cisco Router as FRS

Cisco Router as a Frame Relay Switch

Students Preparing for The CCNA Exam often need to have a frame relay switch in their lab to practice for the Frame-Relay. In this post we are going to tell you how to configure  Frame-Relay Switching on a Cisco Router.
The following are the steps with topology diagram explaining the step by step configuration :

In this example we will take four routers R1, R2, R3 and R4 . The Router R2 will be working as the Frame relay Switch. Now open the GNS3 Simulator and create the following topology with the help of four Routers.


Remember to create topology using only serial cables because Frame-Relay is a Wan technology and works only on Wan links.Now open the console of Router R2 and start configuring it for Frame-Relay with the commands given below.

R2>enable

R2#configure terminal

R2(config)#frame-relay switching

R2(config)#interface s0/0

R2(config-if)#no shutdown

 R2(config-if)#no ip address

R2(config-if)#clock rate 56000

R2(config-if)#encapsulation frame-relay

R2(config-if)#frame-relay intf-type dce

R2(config-if)#frame-relay route 103 interface s0/1 301

R2(config-if)#frame-relay route 104 interface s0/1 401

R2(config-if)#interface s0/1

R2(config-if)#no shutdown

R2(config-if)#no ip address

R2(config-if)#clock rate 56000

R2(config-if)#encapsulation frame-relay

R2(config-if)#frame-relay intf-type dce

R2(config-if)#frame-relay route 301 interface s0/1 103

R2(config-if)#interface s0/2

R2(config-if)#no shutdown

R2(config-if)#no ip address

R2(config-if)#clock rate 56000

R2(config-if)#encapsulation frame-relay

R2(config-if)#frame-relay intf-type dce

R2(config-if)#frame-relay route 401 interface s0/1 104

R2(config-if)#exit

To confirm your FRS is working properly you can use the following command :

R2#show frame-relay route


Sunday 23 October 2011

Basic Troubleshoot Cisco IOS

Cisco  IOS Support a Number of Commands that can be used to monitor and troubleshoot problems related to configuration andhardware diagonosis.Those who has good experience with cisco ios knows how to deal with problems and which commands would help recover and troubleshoot the problems. This post targets the audience which include engineers with less experience and trying to become more familiar with the tools available  for tshoot.

Show Processes CPU

One of the most basic commands to run on a Cisco device is show processes cpu. In its full view the command will show all of the active processes on a device and how much of the processor time the process is taking both currently and historically. Figure 1 below shows a shortened version of the command:


This command would typically be used when troubleshooting a problem with a device that is having trouble performing basic functions; for example if a router is having trouble forwarding and routing packets without loss.


Show Memory

Another command that is commonly in conjunction with the show processes cpu is the show memory command. This command is used to display the current status used and available memory; as with the show processes cpu command the show memory command also displays much more specific information about how memory is being allocated, however the initial information is often enough to get an idea of whether the problem happening is memory related. Figure 2 below shows a shortened version of the command:


Show ip interface brief

One of the most commonly used commands overall is the show ip interfaces brief command. As shown in Figure , this command is very helpful as it displays the interface, its associated IP address and its current status.


Show ip route

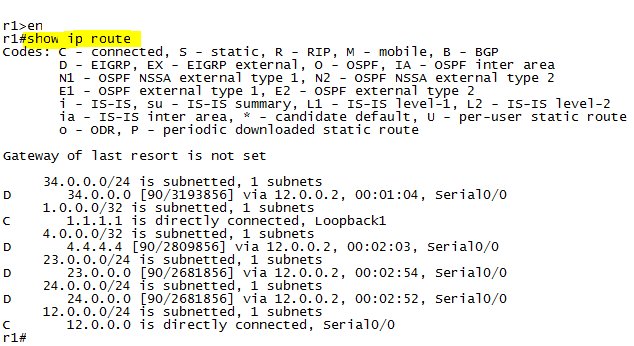
The show ip route command is another often used command on Cisco IOS devices; it is used to display the contents of the current IP (IPv4) routing table. Obviously, when working on a Cisco router the contents of the routing table are a central part of the device operations, if information within the routing table is incorrect it can quickly lead an engineer in a direction to solve a problem. Figure  below shows the command:


Ping

Another very common tool is the ping command, obviously this is a command/tool that is not limited to Cisco IOS but can be used for a variety of different troubleshooting situations on Cisco devices. At its most simple, the ping command is used to send 5 100-byte ICMP echo packets to a specific destination; but the Cisco IOS extended ping command can do a number of different things that allow allot of troubleshooting flexibility. Some of these abilities include altering the ICMP source interface, packet size, packets sent, pattern sent, do not fragment bit, among others. Figure  shows an example of an extended ping:


Traceroute

On the same track as the ping command above the traceroute command is a very basic command that can be very versatile and used in a number of different troubleshooting scenarios. At its most basic the traceroute command is used to trace the route that a packet takes from a source to destination, included with this information is an output of response times between the source and each intermediate device. One often unknown piece of information is that the traceroute command does not work exactly like the tracert command that is used on Microsoft devices; Cisco’s traceroute command uses UDP to trace the route from source to destination, often this is done with other implementations using an ICMP packet. This can be an advantage in many ways because many networks automatically drop ICMP echo packets because they are commonly used in Denial of Service (DoS) attacks. Like the ping command the traceroute command can be configured with a number of different extended parameters including source interface, timeout, number of probes per device hop and UDP port number among others. Figure below shows an example of the traceroute command:


For any query Please Comment Below With Your E-mail ID.


Saturday 15 October 2011

How To configure DHCP Server On a Cisco Router


Hey Friends Today i'm going to Tell You how we can configure a cisco Router as a DHCP Server .

Using a DHCP Server we can Dynamically Provide the following things to a device on our network:
ip address
subnet mask
default-route
DNS server address

In this example we will consider that we have a network range of 10.0.0.0 to 10.255.255.255 for

which we are going to configure the DHCP Server and the DNS Server address would be 4.2.2.2

the default route for each device on the network would be 10.0.0.1

We will exclude the network Range of 10.0.0.0 - 10.0.0.10 so that we can use these addresses later manually
Turn On Your Cisco Router and Type down the following commands :

Router>enable
Router#configure terminal
Router(config)#ip dhcp excluded-address 10.0.0.1 10.0.0.10
Router(config)#ip dhcp pool Maati
Router(dhcp-config)#network 10.0.0.0 255.0.0.0
Router(dhcp-config)#default-router 10.0.0.1
Router(dhcp-config)#dns-server 4.2.2.2


Configuring Password on Cisco Routers

Hello Friends it may be possible in many cases that you want your cisco router to be configured with a password so that no outsider can make access to your cisco router in this post i'm going to describe the procedure of configuring password on a cisco router

Types of Passwords on Cisco Routers 

  1. 1. Line Passwords
  2. 2. Privileged mode Passwords (enable mode )
  3. 3. Username Passwords ( Optional )
First we will understand these Passwords that where do they work.
1. Line Passwords
    Console Line - The console is the main serial administrative port on a router. This is where you configure the router when it is new and has no network configuration.

    Aux Line – The aux line is an auxiliary port. Like the console, it is a physical port on every router. You can think of it as a backup console port. Besides being a backup console port, the aux port is periodically used for administrative console dial up access to the router.

    VTY Lines – Vty lines are “virtual tty” lines and are used when you connect to the router via telnet or ssh. These are not physical lines on the router but virtual “inbound network lines”.

    Async Lines – Async lines are asynchronous serial lines and are optional. These async lines are created when you insert an async serial card in a router. You can use the async serial lines to connect dumb-terminals (text-based terminals), serial printers, or modems.

All of these different lines need a password configured on them. Let’s find out how to configure Cisco router line passwords.


Configuring Cisco Routers with Passwords

Enable Password

To configure enable password on cisco router turn on your cisco router and go through the following commands :


Maati>enable
Maati#configure terminal
Maati(config)#enable password  your password
Maati(config)#exit

Screenshot of My router CLI :


Enable Secret Password

we can see the enable password configured on a cisco router by using the #show run command if you want your enable password to be encrypted you should use the folloing steps insted 


Maati>enable
Maati#configure terminal
Maati(config)#enable secret your password
Maati(config)exit

Screenshot  of My Router CLI :


Console Password

now we will learn how to configure the console password , for console password we will use two commands one for setting password and second to enable console password at the time of login through console. Here is the set of commands you need to follow to set console password.


Maati>enable
Maati#configure terminal
Maati(config)#line console 0
Maati(config-line)password your password
Maati(config-line)login
Maati(config-line )exit

Screenshot Of My Router CLI :


Telnet Password

In case you are not at your office and hence no console access to your Cisco router then you can access  your router remotly, and you must set a telnet password on your cisco router so that no one else can access your cisco router remotly.

Following is the set of commands used to set telnet Password on Cisco Routers.


Maati>enable
Maati#configure terminal
Maati(config)#line vty 0 15
Maati(config-line)password your password
Maati(config-line)login
Maati(config-line)exit

Screenshot My cisco Router CLI :


Username and Password

There may be case when you want people to have access to your router so you can set username and password on your router for diffrent users. 

Following commands are used to set the same :


Maati>enable
Maati#configure terminal
Maati(config)#username username privilege 15 password your password
Maati(config)#username user1 password cisco
Maati(config)#line console 0
Maati(config-line)#login local
Maati(config-line)#line vty 0 15
Maati(config-line)#login local


For any Questions please comment your question below...

Thursday 13 October 2011

Router IOS Images

Free CCNA Practice Stuff,Packet Tracer Activities, Practice Questions For CCNA Exam


Open tab links in browser window instead.

Wednesday 12 October 2011

Packet Tracer Free Download

Free CCNA Practice Stuff Packet Tracer Activities Practice Questions For CCNA Exam


Packet Tracer software      (73.93 Mb)       


Gns3 Lab Simulator             (12.2 Mb)


  Packet tracer + Gns3 + Putty   (107 Mb)


 Cisco ios images for dynamips routers  part 1   (604 Mb)


Cisco ios images for dynamips routers part 2  (467 Mb)


Cisco ios images for dynamips routers part 3  (727 Mb)

Tuesday 11 October 2011

Using secure crt with GNS3 lab simulator


Using Secure CRT with GNS3 in WIN 7

Hey friends, in this post I will guide you how to use secure crt for gns3 lab emulator in win 7 , vista or xp.
Secure CRT is a remote access software which provide us with the features like Telnet, SSH1,SSH2, Rlogin, Serial and TAPI . First of all you need to download the secure crt software with it’s crack . The torrent for the secure crt is available at the following link :


Steps :
1.       Unrar the downloaded file from the above link.
2.       Now install the securecrt.exe as an administrator on your operating system.
3.       After installation don’t start the program
4.       Now open the crack folder and run the TBE file as an administrator (Required admin privilege).
5.       Click on the patch button.
6.       A prompt will pop out and ask to find the securecrt.exe file.
7.       Click on yes and browse for securecrt.exe file in your windows program file directory.
8.       Generally it in     C:\Program Files\SecureCRT   Directory.
9.       Select the securecrt.exe file and the patching will be done automatically
10.   Keep in mind you run the TBE file as an administrator otherwise patching will not be complete.


Settings to be done in Gns3 software :
1.       Open the Gns3 software .

2.       Go to Edit > Preferences…

3.       Now replace  the following path in the terminal commad field :

start telnet %h %p
or
C:\Program Files\Putty\putty.exe -telnet %h %p

With this one :   

start C:\progra~1\SecureCRT\SecureCRT.EXE /script C:\progra~1\gns3\securecrt.vbs /arg %d /T /telnet 127.0.0.1 %p

Now you are done and can use secure crt with the gns3 software..

CCNP Route Gns3 Activities